Papercrafts, mixed media and foamiran flower projects to inspire

Saturday 23 February 2019

Memories


Today I am sharing a mixed media project made with products from a subscription box from the lovely company Craft Box - this UK company has recently started shipping to the States and is clearly going from strength of strength although that will come as no surprise to those of you who already buy from Anna Hersom - I just hope that with all the doom and gloom around Brexit that her supply of Snipart from Marta in Poland is not disrupted as I use this stuff by the bucket full. Anyway enough of politics and on with my project.


I started by taking a very thick piece of kraft like paper with on old map image on, scrunched it up to add some texture and the adhered it to a canvas base approximately 11.5" by 16.5" and left it to dry overnight. I knew that I wanted to have a muted background and I had originally decided that I would use some crackle medium on it and then antiquing creams - instead I added a thick layer of gel medium and spread it using a brayer. - When this was dry I had a surface full of texture and decided I would just add the antiquing cream in a white shade on top before letting it "dry" - antiquing cream never fully dries so once touch dry I then used wet wipes to wipe off the excess until I liked the affect.


I chose by Snipart pieces and coloured them using CraftBox stencil pastes as paint - allowing the details etched into the chipboard pieces to show through. Before collaging the quote cards from the collection along with some pieces of the packaging and the post card supplies list to create my "story".


One of the 6 x 6 papers contained a lot of flowers and butterflies in complimentary colours so I spend some time fussy cutting these out and adding them to my project along with the stickers about travel notes also in the box of goodies.


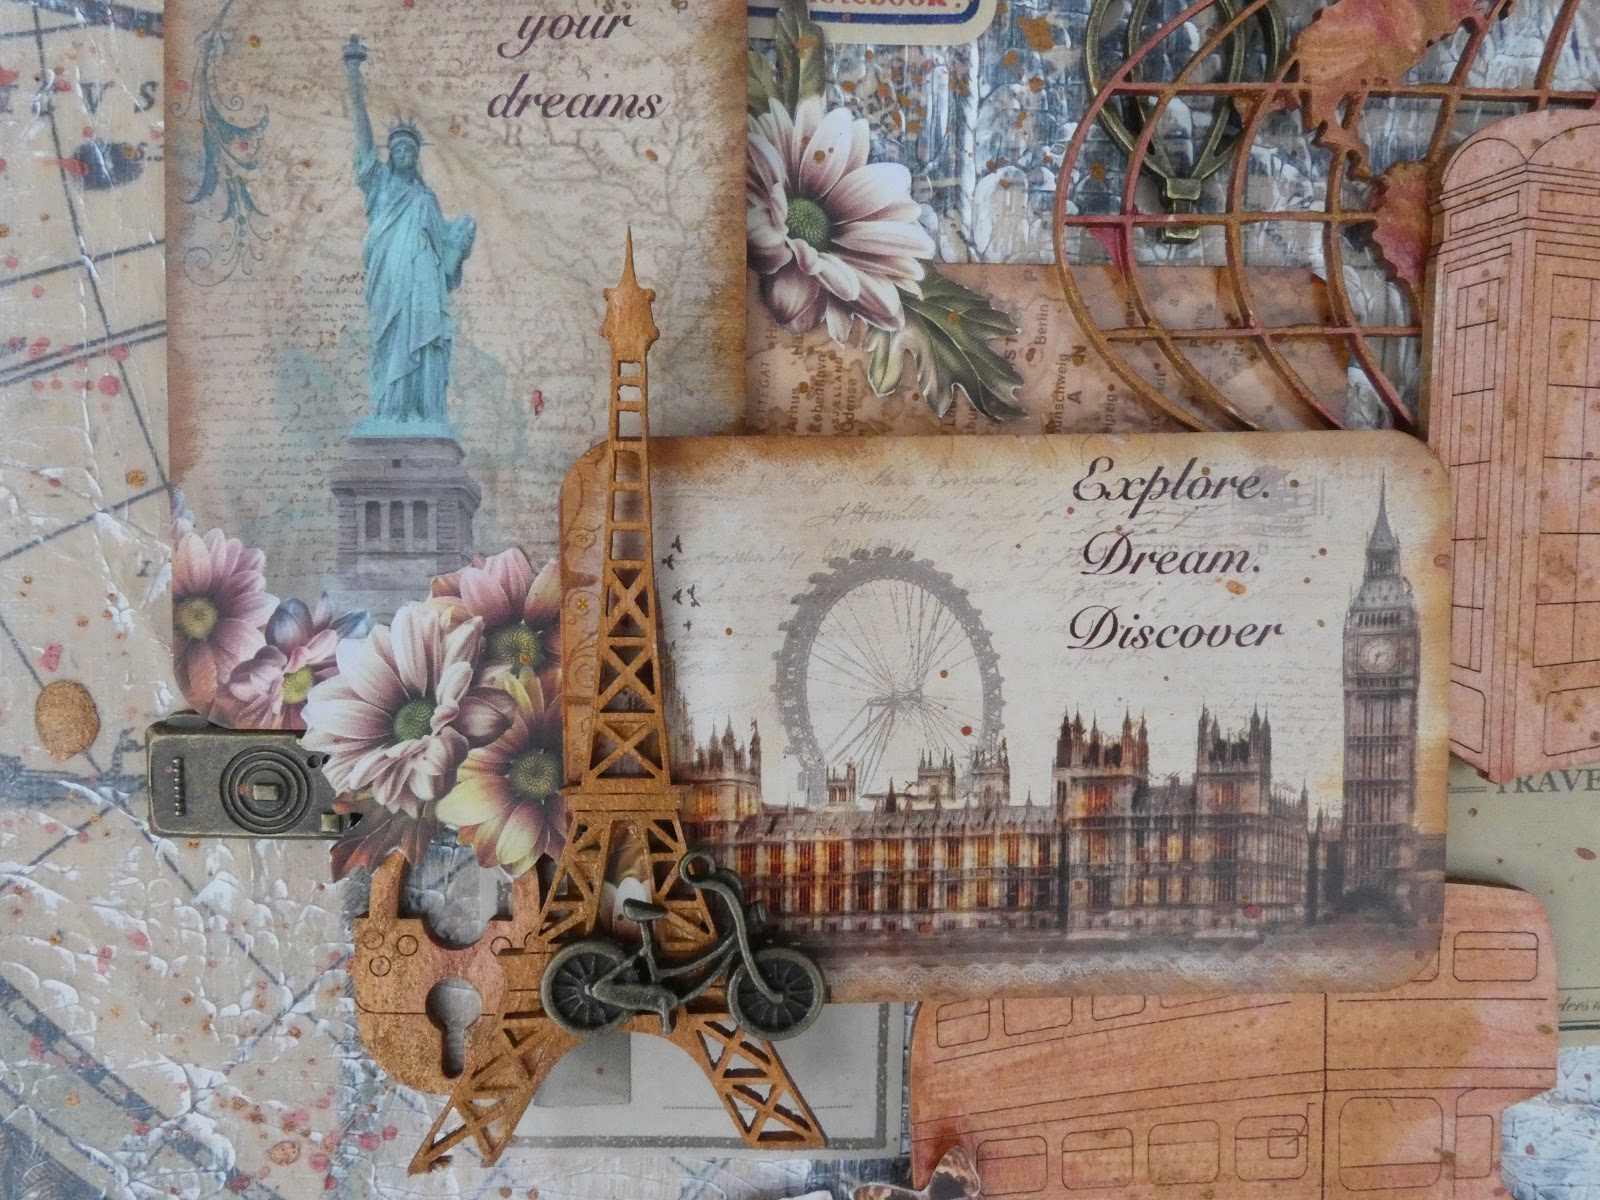
I added some metal charms to the piece - most came from the original box but I did raid my stash for a few extras.


Finally I thinned the stencil paste used for colouring my Snipart pieces with some water and added splatters to the background.

I have to say that I was really pleased with the overall effect that I managed to achieve and hope that you do too.


Monday 18 February 2019

My first ATC's

I have had a hectic week and weekend - work as a surgeon is never simple but is so rewarding. I craft as a way of de-stressing and highly recommend that everyone finds their own way of escaping in to their happy place.


Today I thought I would share my first and second projects done for The Resin Embellishment Shop (FB page)/ www.craftallday.co.uk. Sarah the owner of the shop sent a box full of embellishments focusing on love - some of these were very obvious, some clearly suitable for wedding projects and some less obviously love focused.


My first project was a set of ATC's, as I normally work on much bigger formats I thought I would challenge myself and I have to say that I enjoyed working on this format a lot - the size means that projects can be quick but still have lots of layers a feature of my work which I think I would find difficult to compromise on.


 I used a stencil and paste to create a base layer and then added the resin pieces and feathers made using a silicon cake decorating mould and Stamperia cream paste. I added colours with acrylic paint and then added in the die cuts and lots of flowers before finishing with some words that I felt were appropriate.


My second project is a card, again using layers and this time some "lace" made with a lacey cake decorating mould and the cream paste. I knew that I wanted to use the bird pair and coloured this with paints to co-ordinate with the papers used for the background. The birds were layered on a paper doily and cut outs from the paper pad. 


To complete the project I added some swirly die cuts and foamiran flower made with white silk foam and  purple foamiran.  


I hope that you enjoy these quick projects and hope to post something more detailed next Monday as I have a long weekend off work so should be able to find the time to post a more complex make.

Monday 11 February 2019

Its Elementary


Well what a weekend we have had in the UK - the craft channels seem to be poaching suppliers - before anyone gets upset I am fully aware that the companies in question who are moving from one to the another will have made a decision based on what they believe is best for themselves but some where in the mixed of it a little humanity got lost at least one guest demonstrator was profoundly distressed by not being allowed to say goodbye to her friends. So if any of the people at a certain TC channel see this I am going to say what she had been instructed not to say when she was last in just before the story broke and that is that she loves you all as friends and is sad to be leaving such a happy place to work.

Craft politics over I will now move to my blog post for today having spent a lovely weekend with Jodie Johnson who we all know as the television face of Tonic on the television. We created some beautiful projects and had much fun and laughter raising money for the local hospice - A great example of people working together to achieve a common goal. Hence my post this morning - it is really "elementary my dear Watson" - there should be enough space for all to thrive if we choose not to be greedy and good manners really costs nothing.


I rarely make cards but not wishing to be wasteful decided to use up left overs from a much bigger project. I layered two pieces of paper having edged with distress oxide denim ink and faux stitching creating dimension using foam pads.. I then lifted the word "elementary from one of the sheets of 12 x 12 paper cutting it to form a banner across my card. It was edged in the same way to give a cohesive appearance to the card - I layered in on my foam pads and cut another word element from the paper pad tucking it underneath the banner piece.

The door was supplied by 14 Craft bar as where the flowers, papers, "flair" buttons and Snipart clocks background. The door is made from paper clay and this enables it too take colours far more easily than pieces made from resin - my piece was coloured with some primary elements powders and then blue paint was dry brushed over it to give it depth. The details of the door were cut from the same "Sherlock Holmes" paper pad made by a Russian Company Bee Shabby and added to the paper clay piece.

The Snipart pieces were left from their clocks background and embossed with midnight blue embossing powder which not only adds colour but also strength to this intricate piece. This was tucked under the banner and the door added to the right. 

I added pre-made roses which had been dry brushed with the same blue paint used on the door and tucked these in clusters around the card before adding leaves cut with a Lady E designs die.

The finishing touch were lots of splashes of dark blue acrylic that had been watered down.


I hope you enjoy reading this post today - for me its a simple project having been away for the weekend but I kinda like it and may well make some more cards in the near future.

Tuesday 5 February 2019

My first blog post and design team project.


Welcome to my first blog post. Firstly let me introduce myself - my name is Gill and by day I am a paediatric surgeon by night, weekends and holidays an avid crafter - hence the name of my blog -The Crafty Surgeon.  

I have been crafting for more years than I really care to think about. My mum was a great needlewoman and made all of mine and my sisters clothes so I guess the need to create was in my genes and whilst I can sew, knit, crochet and do embroidery these do not fill my heart with joy in the same way that messing around with paper, paint, inks and pastes does.

I create to preserve my sanity, its a way of expressing my self and fills many a wonderful hour.    Through crafting I can escape into a different world and find peace in a world full of turmoil.

I hope that you will enjoy my crafting journey. My style is quite eclectic with a background of scrapbooking, jewellery making, mixed media crafting thanks to the wonderful Finnabair and more recently flower making. I guess my favourite projects are home décor pieces as they take a while to put together and allow me to add loads of little details. Be warned they are often product heavy, but you will have loads of bits left for further projects. So, go on, I encourage you to get crafting – whether you choose to copy as near as possible or are simply inspired by my makes pick up your crafty items and enjoy the process of creating something as unique as you are.

I am sharing with you my first ever design team project - for 14 Craft Bar hence the links to the products I have used but you will be easily able to source similar materials where ever you are in the world or via the net.


For this project I have chosen to work with the big sewing machine MDF piece made by Snipart and available from 14 Craft Bar. Having constructed the main part of the sewing machine I knew that I wanted to add some texture so using structure paste and a geometric stencil   I added a layer to the front and back of the body of the sewing machine. I then used a roses stencil to add detail to the base.


I made some embellishments using air dry clay and a long ornament, keyhole and decorative swirl moulds  and when these were dry added them to my sewing machine base before giving everything a coat of Americana Decor chalky paint. Once this was dry, I used Decoart ® antiquing cream in patina green to add another layer of colour.  The beauty of this paint is that once it is touch dry you can wipe back to reveal variation in colour creating the vintage effect I was looking for.


I added strips of paper from smile of winter (https://14craftbar.com/home/2589-scrapbooking-paper-smile-of-winter-12x12.html) to the underside and top of the machine edging them with Ranger ® hickory smoke distress oxide ink applied with a sponge dauber . I highlighted the texture on the machine using Prima® art alchemy vintage was in vintage gold. 


I then collected my embellishments - bottles, pins, resin people, a little lace and arranged them on my machine until I was happy with the look.

The chipboard dress mannequin ( from Snipart and available via 14 Craft Bar amongst other sites. was backed with a piece of paperclay to make it look like there was a dress on the frame and to give it more body as I knew it would protrude beyond the edges and needed something extra to have enough support.


I cut out flowers and butterflies from papers an ephemera set and from the paper pad Hugs of Roses https://14craftbar.com/home/789-scrapbooking-papers-house-of-roses-12x12.html and used these to decorate the machine.


From my stash I used a cotton reel, lace, metal embellishments, buttons, resin figurines by Tim Holtz and baker’s twine. I filled some small glass bottles with micro beads and added gem flower centres as bottle lids. Adding the embellishments to my machine before placing it on a decorated paper mache box. Finally I made a card to fit in the bos using small pink roses, white cherry blossoms and a Snipart sentiment.